Prototyping in design is a powerful approach to creating interactive and user-friendly digital products. Figma, a powerful tool for wireframing, designing, and prototyping, enables designers to create interactive prototypes that can be shared and tested with users. This step-by-step guide will walk you through the process of creating a prototype in Figma, highlighting the importance of prototyping in the design process.
Prototyping in Design Step-by-Step Guide
Step 1: Set Up Your Project
Create a New File:
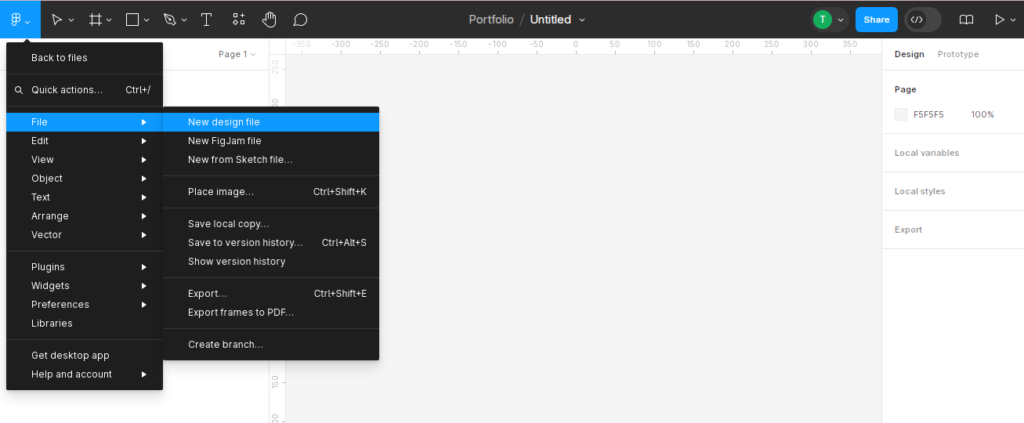
To open Figma and create a new file, follow these steps:
- Open Figma and sign in to your account.
- On the Figma dashboard, click the “New File” button.
Open Figma and create a new file by clicking the “New File” button on the Figma dashboard.
Organize Your Workspace:
Set up frames for different screens or components of your design. Use the Frame tool (F) to draw frames, or choose from preset device sizes available in the properties panel.

Step 2: Design Your Interface
Create Your Layouts:
Use the design tools in Figma to create your user interface elements. This includes shapes, text, images, and more. You can also import assets from other design tools if needed.


Use Components:
Create reusable components (such as buttons, headers, etc.) to maintain consistency across your design. To create a component, select the elements you want to include and press Ctrl + Alt + K (Windows) or Cmd + Option + K (Mac).


Organize Layers:
Keep your design organized by naming layers and grouping related elements. This makes it easier to manage and update your design later.
Step 3: Set Up Interactions
Switch to Prototype Mode:
Click on the “Prototype” tab in the top-right corner of Figma to switch from design mode to prototype mode.

Create Connections:
Select an element in your design that you want to make interactive, such as a button. A blue node will appear on the right side of the element.
Drag the blue node to the frame or element you want to link it to. This establishes a link between the two.

Define Interaction Details:
After creating a connection, a properties panel will appear. Here you can specify the type of interaction (e.g., “On Click”), the destination (the target frame), and the transition animation (e.g., “Instant”, “Dissolve”, “Smart Animate”).

Step 4: Add Advanced Interactions in Figma
Adding advanced interactions to your Figma prototype can significantly enhance the user experience by making it more dynamic and realistic. Here, we will dive into more detail on how to use overlays, smart animate, and other advanced interaction techniques in Figma.
Using Overlays
Overlays are useful for creating interactive elements like modals, pop-ups, dropdown menus, and tooltips. They allow you to display additional content without navigating away from the current screen.
Create the Overlay Frame:
Design the overlay content as a separate frame. This frame should contain the elements you want to display, such as a modal window or a dropdown menu.
Link to the Overlay:
Select the element that will trigger the overlay (e.g., a button). In prototype mode, drag the blue node from the trigger element to the overlay frame.

In the interaction details panel, select “Open Overlay” from the action dropdown menu.

Configure Overlay Settings:
Position: Choose where the overlay will appear in relation to the trigger element (e.g., “Top Center,” “Bottom Right”).
Close When Clicking Outside: Enable this option if you want the overlay to close when the user clicks outside of it.


Animation: Select the type of animation for the overlay appearance (e.g., “Instant,” “Dissolve,” “Move In”).


Quick Demo Video on Overlay
Test the Overlay:
Enter the present mode and test the interaction to ensure the overlay behaves as expected.
Using Smart Animate
Smart Animate is a powerful feature that creates smooth transitions between frames by animating changes to properties like position, size, and opacity of elements. For Smart Animate to work effectively, elements in both frames must have the same layer names.
Design Consistent Elements:
Ensure that the elements you want to animate have consistent names and structure across the frames. For example, if you are animating a button, it should have the same layer name in both the initial and destination frames.
Link the Frames:
In prototype mode, connect the initial frame to the destination frame using the blue node.
Configure Smart Animate:
In the interaction details panel, select “Smart Animate” from the transition dropdown menu. Adjust the easing (e.g., “Ease In,” “Ease Out,” “Ease In and Out”) and duration to control the animation’s speed and style.


Quick Demo Video on Smart Animate
Test the Animation:
Enter present mode to see the Smart Animate effect in action. Make adjustments to the design or animation settings as needed to achieve the desired effect.
Conclusion
Prototyping in design with Figma is a powerful way to bring your designs to life, allowing for interactive and engaging user experiences. Advanced interactions in Figma allow, you to create highly interactive and engaging prototypes that closely mimic the final product’s behavior. By using overlays, Smart Animate, advanced transition effects, and variables, you can create sophisticated user experiences that provide valuable insights during the design process. Experiment with these features to enhance your prototypes and deliver more polished, user-friendly designs.